


Your garage door opener is more than just a convenience—it’s a crucial element of your home’s security and functionality. However, to ensure it operates smoothly and safely, proper wiring is paramount. In this guide, we’ll walk you through the process of wiring a garage door opener, covering every step in detail. Whether you’re a seasoned DIY enthusiast or a first-time installer, you’ll gain the knowledge and confidence needed to wire your garage door opener with precision and care. So, let’s embark on this journey together and learn how to wire a garage door opener for optimal performance and peace of mind.
Garage Door Opener Essentials
When it comes to understanding how to wire a garage door opener, it’s essential to first familiarize yourself with the various components that make up the system. The main parts of a typical garage door opener include:
- Opener Motor: This is the heart of the garage door opener, responsible for lifting and lowering the door. It’s usually mounted on the ceiling of the garage near the center.
- Wall-Mounted Control Panel: Located inside the garage, this panel allows you to operate the garage door opener manually, typically with buttons for opening, closing, and stopping the door.
- Remote Controls: These handheld devices enable you to operate the garage door opener from a distance, usually from inside your vehicle as you approach or leave your home.
- Safety Sensors: These sensors are installed near the bottom of the garage door tracks and are designed to detect obstructions in the door’s path. They prevent the door from closing if something or someone is in the way, enhancing safety.
Wiring’s Vital Role
Now that you’re familiar with the key components of a garage door opener, let’s discuss the critical role that wiring plays in its functioning. Wiring serves as the communication network that connects these components, allowing them to work together seamlessly.
For example, the wiring carries electrical signals from the wall-mounted control panel or remote controls to the opener motor, instructing it to open or close the garage door. Similarly, the safety sensors are wired to the opener motor, sending signals that prompt it to stop and reverse the door’s movement if an obstruction is detected.
Without properly installed and maintained wiring, these signals may not be transmitted correctly, leading to malfunctions or safety hazards. Therefore, ensuring that the wiring is correctly installed, insulated, and secured is essential for the safe and efficient operation of your garage door opener.
Avoiding Mistakes, Ensuring Safety
When wiring a garage door opener, there are several common mistakes that DIY enthusiasts and even professionals can make. Some of these include:
- Incorrect Wiring Connections: Mixing up wires or connecting them to the wrong terminals can lead to erratic operation or damage to the opener motor.
- Exposed Wiring: Failing to properly insulate and protect wiring can increase the risk of electrical shocks or short circuits, posing a safety hazard.
- Ignoring Manufacturer Guidelines: Each garage door opener may have specific wiring requirements outlined by the manufacturer. Failing to follow these guidelines can void warranties or compromise safety.
To avoid these pitfalls, it’s essential to take appropriate safety precautions and adhere to best practices when wiring a garage door opener. Some key safety measures include:
- Always turn off the power to the garage door opener before beginning any wiring work to prevent electrical accidents.
- Use insulated tools and wear appropriate protective gear, such as gloves and safety goggles, when working with wiring.
- Double-check all wiring connections and ensure they are secure and properly insulated to prevent loose connections or exposed wires.
- Follow the manufacturer’s instructions and wiring diagrams closely to ensure the correct installation and operation of the garage door opener.
By understanding these common mistakes and taking the necessary safety precautions, you can ensure a smooth and safe wiring process for your garage door opener. Now that we’ve covered the basics of understanding the components and the role of wiring, let’s move on to preparing for the installation process.
Preparing for Installation
Gather the Necessary Tools and Materials
Before diving into the wiring process, it’s crucial to ensure you have all the necessary tools and materials on hand. The following is a list of items you will need:
Wire strippers: For removing insulation from the ends of wires.
- Screwdrivers: Both flathead and Phillips-head screwdrivers may be required for various connections.
- Electrical tape: To insulate exposed wires and secure connections.
- Wire nuts: Used to connect wires together securely.
- Cable staples or clips: To secure wiring along walls or ceilings.
- Safety goggles and gloves: To protect yourself from potential electrical hazards.
Additionally, make sure you have the correct gauge and type of wire specified by the garage door opener manufacturer. Having all these tools and materials readily available will streamline the installation process and minimize interruptions.
Shut Down the Garage Door Opener’s Power
When working with electrical systems, safety should always come first. Before beginning any wiring work, it’s crucial to turn off the power supply to the garage door opener. This helps prevent the risk of electric shock or damage to the opener motor.
Locate the circuit breaker or fuse box that controls the power to your garage door opener. Switch off the corresponding circuit breaker or remove the fuse to cut off electricity to the opener. Use a voltage tester to verify that the power is indeed off before proceeding with any wiring work.
Never assume that the power is off without testing it first, as this could lead to serious injury or damage to your garage door opener. Taking the time to ensure the power is safely disconnected is a small but critical step in the installation process.
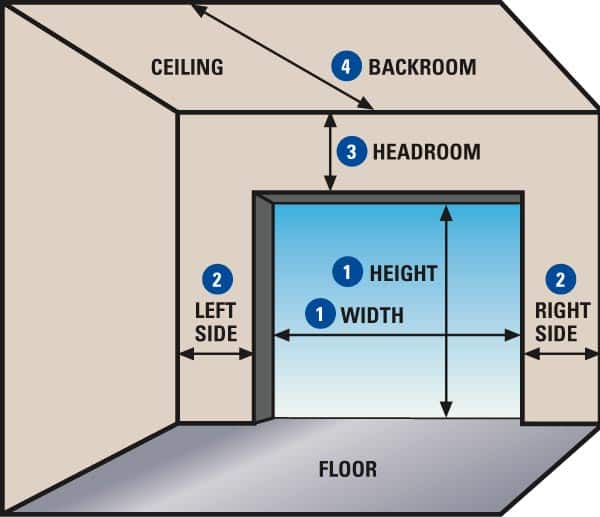
Assess the Layout and Determine the Best Wiring Route
With the power turned off and your tools at the ready, it’s time to assess the layout of your garage and plan the wiring route for your garage door opener. Consider the following factors:
- Distance from the opener motor to the power source: Determine the length of wire needed to connect the opener motor to the nearest power outlet or junction box.
- Obstacles and obstructions: Identify any obstacles, such as beams or walls, that may affect the routing of the wiring. Plan alternate routes if necessary to avoid obstacles and ensure a clean installation.
- Accessibility: Ensure that the wiring route is easily accessible for future maintenance or repairs. Avoid running wires through inaccessible or hard-to-reach areas of the garage.
- Safety considerations: Keep wiring away from sharp edges or moving parts of the garage door mechanism to prevent damage or interference.
By carefully assessing the layout of your garage and planning the wiring route in advance, you can minimize potential obstacles and ensure a smooth installation process. Taking these preparatory steps will set the stage for a successful wiring job and help ensure the long-term reliability and safety of your garage door opener.
Wiring the Garage Door Opener
Step-by-Step Instructions for Wiring the Opener Motor
Wiring the opener motor is a crucial step in installing a garage door opener, and it’s essential to follow the manufacturer’s instructions carefully. Here’s a step-by-step guide to help you navigate this process:
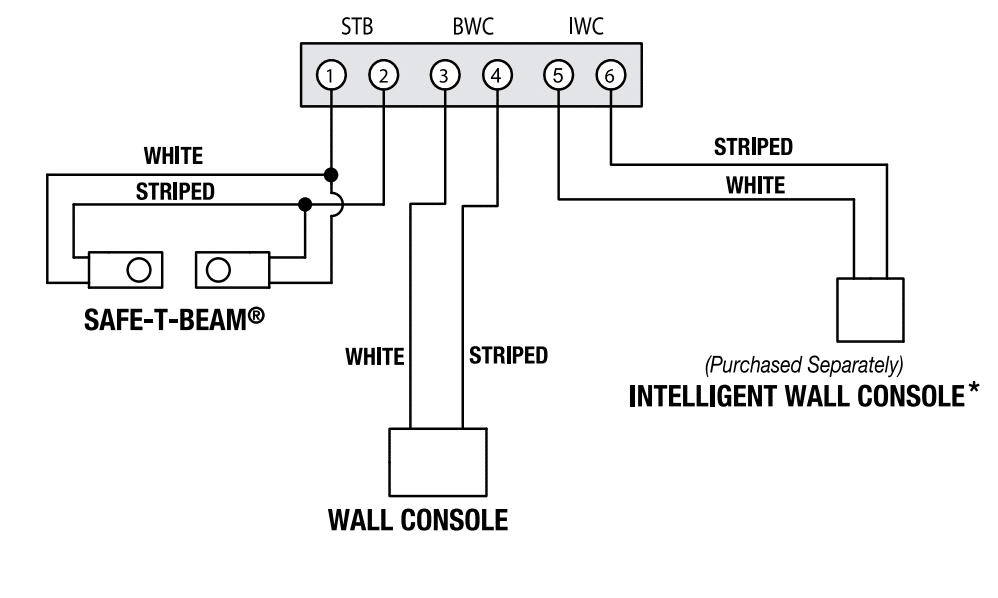
- Locate the Wiring Terminals: Start by locating the wiring terminals on the opener motor. These terminals are typically labeled and may be color-coded for easy identification.
- Prepare the Wires: If your garage door opener doesn’t come with pre-wired cables, you’ll need to cut the appropriate length of wire and strip the insulation from the ends using wire strippers. Be sure to use the correct gauge of wire recommended by the manufacturer.
- Connect the Wires: Match the wires from the opener motor to the corresponding terminals, following the wiring diagram provided by the manufacturer. Typically, there will be terminals for power (usually labeled “L” and “N” for live and neutral) and control (for connecting to the wall-mounted control panel and safety sensors).
- Secure the Connections: Once the wires are connected to the terminals, secure them in place using wire nuts or terminal screws provided with the opener. Make sure the connections are tight and insulated to prevent any loose or exposed wires.
- Test the Connections: Before proceeding further, it’s essential to test the wiring connections to ensure they are secure and functioning correctly. Restore power to the garage door opener and test the motor’s operation using the wall-mounted control panel or remote control.
Connecting the Opener to the Power Source
With the opener motor wired and operational, the next step is to connect it to the power source. Here’s how to do it safely:
- Locate the Power Source: Identify the nearest power outlet or junction box where you’ll be connecting the garage door opener. Ensure it’s within reach of the opener motor’s wiring.
- Turn Off Power: As a safety precaution, turn off the power to the designated outlet or junction box before making any connections.
- Connect the Power Cord: If your garage door opener comes with a power cord, plug it into the power outlet. Alternatively, if it requires hardwiring, connect the appropriate wires from the opener motor to the corresponding terminals in the junction box, following local electrical codes and regulations.
- Test the Power Connection: Once the power connections are made, restore power to the outlet or junction box and test the garage door opener’s operation to ensure it’s receiving power correctly.
Securing and Organizing the Wiring to Prevent Hazards
With the wiring connections in place, it’s crucial to secure and organize the wires to prevent hazards and ensure a neat and tidy installation:
- Secure Loose Wires: Use cable staples or clips to secure the wiring along walls or ceilings, keeping it away from sharp edges or moving parts of the garage door mechanism.
- Organize Wiring: Bundle together any excess wiring using cable ties or Velcro straps to prevent tangling and make future maintenance easier.
- Insulate Exposed Wires: Ensure that any exposed wires are properly insulated using electrical tape or wire loom to prevent electrical shocks or short circuits.
- Check for Clearance: Make sure the wiring has adequate clearance from the garage door tracks and other moving parts to avoid interference during operation.
By following these steps to wire the garage door opener, connect it to the power source, and secure the wiring, you’ll ensure a safe and reliable installation that will provide years of trouble-free operation.
Testing and Troubleshooting
Testing the Functionality of the Wired Opener
Once the garage door opener is wired and connected to the power source, it’s time to test its functionality to ensure everything is working correctly. Here’s how to conduct a thorough test:
- Operate the Opener: Using the wall-mounted control panel or remote control, open and close the garage door multiple times to verify that the opener responds promptly and operates smoothly.
- Check for Smooth Movement: Observe the movement of the garage door as it opens and closes. Look for any jerky or uneven motion, which could indicate a problem with the wiring or alignment.
- Test Safety Features: Test the functionality of the safety sensors by placing an object, such as a cardboard box or broomstick, in the path of the closing garage door. The door should automatically reverse direction if the sensors detect an obstruction.
- Listen for Unusual Sounds: Pay attention to any unusual sounds, such as grinding or scraping noises, which could indicate a mechanical issue with the opener or the garage door itself.
- Inspect Wiring Connections: Visually inspect all wiring connections to ensure they are secure and properly insulated. Tighten any loose connections and reapply electrical tape if necessary.
Troubleshooting Common Wiring Issues
Despite your best efforts, you may encounter some common wiring issues during testing. Here’s how to troubleshoot and resolve them:
- Intermittent Operation: If the garage door opener operates intermittently or erratically, check for loose or damaged wiring connections. Reconnect any loose wires and replace any damaged wires or connectors.
- No Power: If the garage door opener fails to receive power, double-check the power source and ensure it’s properly connected. Test the outlet or junction box with a voltage tester to verify that power is reaching the opener.
- Safety Sensor Malfunction: If the safety sensors fail to detect obstructions and the garage door doesn’t reverse direction, check the alignment of the sensors and clean any dirt or debris obstructing their view.
- Short Circuits: If the garage door opener repeatedly trips the circuit breaker or blows a fuse, it may indicate a short circuit in the wiring. Inspect the wiring for any exposed or damaged areas and repair or replace them as necessary.
Ensuring Safety Measures Are in Place Before Finalizing Installation
Before finalizing the installation of your garage door opener, it’s crucial to ensure that all necessary safety measures are in place to protect you and your family:
- Clearance and Safety Zones: Ensure that there is adequate clearance around the garage door tracks and safety zones to prevent injuries or damage to property.
- Emergency Release Mechanism: Test the emergency release mechanism to ensure it’s functioning correctly. This allows you to manually open the garage door in case of a power outage or malfunction.
- Secure Remote Controls: Keep remote controls out of reach of children and securely stored to prevent unauthorized access to the garage.
- Review User Manual: Familiarize yourself with the user manual and safety guidelines provided by the manufacturer. Follow any additional recommendations or precautions to ensure safe operation.
By thoroughly testing the functionality of the wired opener, troubleshooting common wiring issues, and ensuring all safety measures are in place, you can finalize the installation of your garage door opener with confidence, knowing that it will provide reliable and safe operation for years to come.
Maintenance and Further Tips
Tips for Maintaining the Wiring and Overall System
Maintaining the wiring and overall system of your garage door opener is essential for ensuring its long-term reliability and safety. To ensure that your garage door opener is operating at its best, consider the following advice:
- Regular Inspection: Periodically inspect the wiring connections, safety sensors, and other components of your garage door opener for signs of wear, damage, or corrosion. Deal with any difficulties as soon as possible to keep them from getting worse.
- Keep Wiring Organized: Routinely check the wiring to ensure it remains properly organized and secured. Avoid letting wires become tangled or exposed, as this can lead to damage and electrical hazards.
- Lubricate Moving Parts: Apply lubricant to the moving parts of your garage door, such as hinges, rollers, and springs, to reduce friction and prolong their lifespan. Observe the manufacturer’s guidelines on the kind and frequency of lubricant use.
- Test Safety Features: Regularly test the safety sensors and emergency release mechanism of your garage door opener to ensure they’re functioning correctly. Accidents and injuries may be avoided in this way.
- Schedule Professional Maintenance: Consider scheduling annual maintenance with a professional garage door technician to inspect and tune up your garage door opener. They can identify potential issues early on and perform any necessary repairs or adjustments.
Additional Resources for Advanced Troubleshooting and Upgrades
Sometimes, troubleshooting more complex issues or implementing upgrades to your garage door opener may require additional expertise or resources. Here are some options to consider:
- Manufacturer’s Support: Contact the manufacturer of your garage door opener for technical support and assistance with troubleshooting. They may offer online resources, customer support hotlines, or service technicians who can help diagnose and resolve issues.
- Online Forums and Communities: Participate in online forums or communities dedicated to garage door openers and home improvement. You can seek advice from other DIY enthusiasts or professionals who have experience with similar issues.
- Professional Installation and Upgrades: If you’re not confident in your ability to troubleshoot or perform upgrades yourself, consider hiring a professional garage door technician. They can diagnose and fix complex issues, as well as recommend and install upgrades to improve the performance and functionality of your garage door opener.
As we wrap up our guide on how to wire a garage door opener, let’s recap some key points and reminders to keep in mind:
- Prioritize safety at every step of the installation process, from turning off power to the garage door opener to securing wiring and testing safety features.
- Follow manufacturer guidelines and wiring diagrams closely to ensure the correct installation and operation of your garage door opener.
- Regularly inspect and maintain the wiring and overall system of your garage door opener to prevent issues and ensure its long-term reliability.
- Seek professional assistance for advanced troubleshooting or upgrades if needed, and don’t hesitate to reach out to the manufacturer or online communities for support.
By following these tips and reminders, you’ll be well-equipped to wire and maintain your garage door opener safely and effectively, enjoying the convenience and security it provides for years to come.

FAQs on Garage Door Opener Wiring
How do I know if my garage door opener needs rewiring?
Signs that your garage door opener may need rewiring include intermittent operation, flickering lights, or burnt-out components. If you notice any unusual behavior or experience frequent malfunctions, it’s best to have a professional technician inspect the wiring to determine if rewiring is necessary.
Can I use any type of wire for wiring a garage door opener?
It’s crucial to use the type and gauge of wire recommended by the manufacturer of your garage door opener. Typically, low-voltage stranded wire is used for wiring garage door openers. Using the wrong type or gauge of wire can lead to malfunctions or safety hazards, so always follow the manufacturer’s specifications.
What safety precautions should I take while wiring a garage door opener?
Prioritize safety by turning off the power to the garage door opener before starting any wiring work to prevent electrical shocks. Put on safety goggles and insulated gloves to shield yourself from possible risks. Double-check all wiring connections to ensure they are secure and properly insulated, and avoid working alone in case of emergencies.
How long does it typically take to wire a garage door opener?
The time it takes to wire a garage door opener can vary depending on factors such as your level of experience, the complexity of the installation, and any unforeseen challenges encountered along the way. In general, it may take a few hours to complete the wiring process, including preparation and testing.
What should I do if my garage door opener stops working after wiring it?
If your garage door opener stops working after wiring it, first check for any loose or damaged wiring connections. Ensure that the power supply to the opener is still intact and that all safety features are functioning correctly. If you’re unable to identify the issue, consider consulting the manufacturer’s troubleshooting guide or contacting a professional technician for assistance.
Conclusion Top of Form
Proper wiring is the backbone of a reliable and safe garage door opener system. It ensures smooth communication between components, allowing for seamless operation and enhanced safety features. By investing time and care into the wiring process, you not only guarantee the longevity of your garage door opener but also safeguard your home and loved ones against potential hazards.
As you embark on the journey of wiring your garage door opener, remember the importance of following the outlined steps meticulously. From gathering necessary tools and materials to testing and troubleshooting, each step plays a crucial role in ensuring a safe and efficient installation. By adhering to best practices and taking necessary precautions, you’ll not only achieve a successful wiring job but also gain confidence in your ability to tackle future home improvement projects.
Ready to get started? Dive into the detailed steps and expert advice provided in the preceding sections to guide you through every stage of wiring your garage door opener. Whether you’re a seasoned DIY enthusiast or a first-time installer, you’ll find valuable insights and practical tips to help you navigate the process with ease. Your garage door opener awaits—let’s ensure it’s wired for success!